

Greetings all! I've asked the list admin to pin this to the top of this forum if he sees fit. Questions, comments, and additional info/suggestions are welcomed and appreciated. I've tried to give credit where credit is due...forgive me if I've forgotten to mention anyone who contributed.
This is a list of the most commonly asked questions by new owners of the GPR125R, GPR125 Nude, and Gilera SC125, all of which are basically the same motorcycle. Note that this thread mostly applies only to the 2 stroke version, not the new 4 stroke version. However, thanks to ROBOSNAIL, we now have at least a little bit of helpful info for you 4T guys. You'll find it at the end of my post here.
BIG UPDATE!!! Finally a little luvin' for you 4T guys, compliments of miniyo! A link to parts, service, and owners manuals for the 4T GPR125. Make sure you look miniyo up here on the forum and give him a standing ovation for providing this much awaited info!
GPR125 4T manuals (click me)
For you 2t guys, please read this thread thoroughly before asking questions in the GPR125 forum which may already be addressed here. There is also a decal on the underside of the front seat with a wealth of quick tidbits of info, such as fuel, oil, and spark plug recommendations, tire pressures, etc. While everyone on the forum is eager to help out new owners, the list tends to get cluttered with the same questions being asked again and again. If you can't find what you're looking for here, then by all means feel free to start a new thread to introduce yourself and pose your question to those who are familiar with these bikes. I'll try to update this FAQ section periodically as the need arises. So without further ado, I give you the Derbi GPR125/Gilera SC125 frequently asked questions!
Derestriction
The most common question new owners have about these bikes is derestricting. The process is quite simple, but the legalities of it a little less so. If you derestrict your bike and it violates the laws of where you live or your particular license status…that's on YOU. This is a guide to tell you how, not a declaration that you should! The benefits are notably increased top end power and speed. This engine is equipped with something called a power valve. It's installed in the exhaust port of the cylinder and makes the port larger or smaller depending on engine speed. When the bike is restricted, the power valve remains in the closed position, thereby restricting exhaust flow and keeping power output down. When you first turn on the key without starting the engine, you'll hear two whirring sounds in succession for about one and a half seconds each time. This is "self-test" of the power valve system and is intended to keep the valve from collecting a lot of carbon buildup and sticking or seizing. Apparently, the self-test occurs even if the bike is still restricted, but the power valve will not function during engine operation unless the bike is derestricted. The system is serviceable should the valve become stuck, but if you're not the mechanically inclined type, you might want to leave the task to someone who is.
The derestriction process is simple. Under the riders seat and towards the right side of the subframe (right side as you're sitting on the bike), you'll find a wiring harness with a fuse holder inline but no fuse in it. Putting a 7.5 amp fuse in the open slot will enable the power valve system and dramatically increase top end speed and power. Putting in a bigger fuse will NOT produce more power. It will only create a risk of doing damage to the electrical portion of the system. Use the 7.5 amp.
There is no restrictor per se in the exhaust system other than the typical conservative build of standard exhaust systems. This exhaust is also equipped with a catalyst which cannot be easily removed. A good aftermarket exhaust will definitely liven things up and shave a fair amount of weight off the bike in the process, but there's really nothing you can do to improve the original exhaust. Again, determining the legality of such modifications is up to you.
The airbox has an inlet funnel which is somewhat restrictive, being that its opening is smaller than the carb venturi, but it serves as more than just a restrictor, being there to smooth the intake of air into the airbox and should really only be removed in the case of bikes that have had greater than typical modifications performed.
Some have suggested that a cooler plug is necessary when derestricting, but in practical application this has proven to be unnecessary and will more likely cause plug fouling. The standard plug is an NGK BR8ES and appears to be fine under all circumstances. Under ALL cases, it is imperative that you always use high octane petrol and a good quality 2 stroke oil made specifically for injection systems. Using anything less falls under the category of being penny-wise and pound foolish, as it will likely result in a VERY expensive engine failure! Don't say you weren't warned!
The carburetor appears to be jetted a wee bit rich from the factory and can stand up to derestriction and seemingly also to an aftermarket exhaust. Removing the airbox restrictor however is more than the standard jetting can take and this will cause performance issues without rejetting.
Gearing
One of the simplest and most effective modifications to these bikes is a gearing change. They appear to be grossly overgeared from the factory and few can pull top gear well, even when derestricted. Changing to a lower final drive ratio absolutely transforms these bikes, making them accelerate much more quickly! There is a slight loss of ultimate top speed, but most can only obtain that speed on a looooong downhill grade. Lowering the final drive ratio makes the bike reach highway speeds with much greater ease under any conditions and makes around town speeds feel much more lively.
The bikes come with 16t front and 50t rear, in spite of the factory service manual indicating that standard gearing is 16t front and 57t rear! Getting the bike closer to the ratio indicated in the service manual is definitely a change for the better. Dropping the front sprocket one tooth (from 16 down to 15) is a quick, cheap fix and a step in the right direction.
It is my personal opinion however (and you know what they say about opinions) that this is not enough of a ratio change to truly make the most of the power output of these bikes. However, dropping to a 14t front sprocket puts too much stress on both the chain and the chain slipper on the swingarm. A better but pricier solution is to go with a 15t front and a 53 or 54t rear. If you're a smallish person, the 15/53 should prove to be a good combination. If you're a larger person, you may wish to go with a 54t rear. Note that going to a larger rear sprocket will also necessitate a longer chain which makes this an even pricier endeavor. This is not a bad thing though, as the standard chain appears to be of VERY poor quality and will be short lived anyway even with faithful care. This ratio change just gives you a good reason to buy a better quality chain. The standard chain is 428 x 130 links. Going to a smaller front sprocket and larger rear sprocket will require a chain at least 132 links in length, possibly 134 links if you go with the 54t rear. My personal GPR, derestricted and with an Arrow pipe, standard carb and jetting, and a 15/53 ratio will still pull 89 mph on top (GPS verified…the standard speedo is crap!). If you need to go faster than that on public roadways, you're a menace anyway.
![Image]()
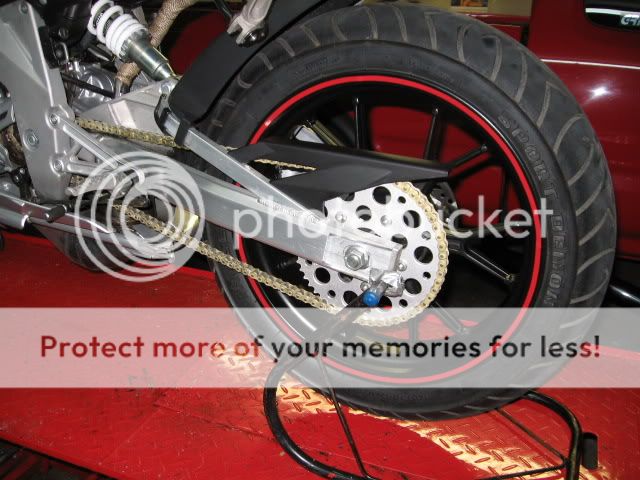
Sprocket availability for this bike is nowhere near as good as say your average GSXR, but we won't go there. Front sprockets can be had by ordering for a Yamaha YZ85, (Thanks Banzairx7!) or by ordering from JT Sprockets . There doesn't appear to be any reasonable off-the-shelf replacement for the rear wheel sprocket. However, Rebel Gears in the United States has the specs for this sprocket, can make one with as many teeth as you like, and ships worldwide. Their alloy sprockets are strong, lightweight, and very attractive. I opted for the ultralight model, having far more lightening holes than their standard alloy sprocket. Turned out looking like this:
![Image]()
Should you wish to have a rear sprocket made by someone closer to you, the rear sprocket specs are as follows;
Flat - no offset
428 pitch
5 bolt pattern
Center hub hole diameter = 61.85 mm (2.435")
Bolt hole diameter = 10mm (0.394")
Distance from edge of hub hole to edge of bolt hole = 17.9 mm (0.705")
Distance from hub center to bolt hole center = 53.825 mm (2.12")
Any sprocket maker worth his salt should be able to make you a rear sprocket from these dimensions.
Meters
Although the owner's manual states that the speedometer can be switched between mph and kph, it seems that many of them simply won't do it. Some who had their clocks replaced under warranty say that their originals would switch, but the replacements won't. In short, if you've tried repeatedly to get yours to switch (following the procedure in the owner's manual…you do know where your owner's manual is, right??), then odds are that they're not going to. The standard speedometers are typically a bit optimistic, but this should just help keep you out of trouble, eh?
The low fuel warning light is simply put, a useless and unreliable piece of dung. If the bike is started and allowed to idle while sitting on the sidestand when the tank is a bit low on fuel, the warning light will come on prematurely. VERY annoying. I recommend unplugging it to avoid the annoyance of it altogether. It's one simple connector located under the fuel tank (it's the ONLY electrical connector coming off the fuel tank). Once the low fuel warning light comes on (the little petrol pump flashing on the digital display), the small display at the bottom will randomly start doing a count up, which appears to be the distance you've traveled since the warning came on. It will go away once you refill the petrol tank. The tripmeter works fairly well, so the smart thing to do is to ALWAYS reset the tripmeter when refilling the petrol tank. When getting used to the bike, it's wise to ride approximately 95 miles (150 kilometers) and then either carry a small petrol can with you, or have someone follow you with a spare petrol can and ride the bike until it runs out of fuel. Now look at your tripmeter…that's how far you can go before you're pushing the bike instead of riding it. Note for those sorely lacking in common sense: Many factors can affect fuel consumption, such as around town riding vs. highway riding, modifications, etc, so it's wise to always allow a margin for error, unless of course you like pushing your bike more than riding it.
I won't go into setting the clock or resetting the service reminder, as these items are readily found in the owner's manual…read it!
There is an indicator to warn you when the injection oil level is low. Don't panic when it comes on, as there is a reasonable amount of oil left in the bottle at this point (I've gone 30 miles with the light on without running totally out of oil). But do NOT ignore the light, as running the bottle empty WILL do significant and expensive engine damage!
Mirrors
Put simply, the GPR mirrors look cool, but they're fragile, expensive, and useless for actually seeing behind you. There is some hope though for repairing and modifying them to make them more useful. This step by step how-to comes from Banzairx7...master of modifications for the GPR.
Once you've got the mirror off the bike you need separate the base from the mirror. Use the open end of a 13mm wrench with a screwdriver through the box end to remove the brass nut.

Then you need to unpin the connector to slide the base off the wire. Use a very small screwdriver to push the tabs on the pins down. then be sure to bend the tabs back up so they'll stay in the connector when it goes back together. I used a razor blade for that.


Now you'll find the broken pieces. The washer embedded in the base just pulls out and takes some plastic with it. You can pop this washer back in place pretty easily. Don't worry about gluing it or anything.


Now you'll need a washer with an ~1/2"(13mm)ID X 15/16"(24mm)OD. Then grind a large flat on one side of the washer.

Now put the mirror back together with the washer like this-

Now slide on two more smaller washers and tighten the brass nut down. These washers aren't as critical as the first they just need to fit over the threaded stud coming off the mirror. The thread on this stud doesnt go all the way so you need these washers so the nut will tighten everything down with out bottoming.

This step here is optional but I highly recommend it. Put a washer on the rear most stud before putting the base back on. This will give you a much better rear view of the world through the mirror.

Now slide the base back over the wire and put your connector back together. Bolt the mirror back on the bike and your done. The mirror is much more stable and doesn't shake nearly as much now with the stock set up.
Brakes
The GPR125/SC125 brakes are somewhat lackluster for what appear to be top notch components, and they do have their issues as well. The standard front pads are horribly noisy. Aftermarket replacements are available from Brembo, EBC, and GoldFren to name a few. It's important to note that when shopping for replacements that the 125 uses the "radial mount type" front caliper. Interestingly enough though, when I ordered GoldFren pads for mine, even though they were supposed to fit the radial mount calipers, they did not. I was able to grind some material off the backing plate of the pads though and make them fit. They've worked well for me thus far. There have been MANY reports of front caliper pistons seizing and premature failure of the REAR pads. I personally have experienced neither and my bike is ridden hard and ridden often. Of those who've reported these failures, the cure seems to be aftermarket pads for the rear, and meticulous cleaning and lubricating of the front caliper pistons and seals. In spite of much expensive experimentation, I've found it impossible to bring the standard front brakes up to "Superbike quality". I believe the problem lies in the master cylinder ratios, but unfortunately, physical constraints don't allow for easy retrofitting of something better.
Tires and Tire pressures
Like everything else, opinions vary in regards to tires. My personal opinion regarding the standard Pirelli Sport Demons is very poor, but that's just my opinion…some people love them. It is noteworthy however that many current top shelf sportbike tires come in sizes suitable for this bike. No one here as yet has tried replacing the standard 110 front with a 120, which I think would be ill-advised as the 120 tire is recommended for a notably wider wheel. Should someone here actually attempt to fit a 120 to their Derbi front wheel and survive it, their personal results will be included...and Godspeed to them.
![Image]()
I did however fit a set of Bridgestones excellent BT-016 sportbike tires to my own GPR, retaining the standard front size, but replacing the rear 140/70 with a 150/60. The results were (IMO) excellent and I plan on going this route from now on.
Tire pressures are a very subjective thing. Regardless of whether it's a car or a bike, you should always refer to the vehicle manufacturer's recommendations, not the tire manufacturer. For the GPR125/SC125, the recommended pressure is 26 psi front and 29 psi rear. These should be used as starting points, because no one pressure will be ideal for everybody all the time. A heavier rider or someone who carries a passenger or heavy packages on their bike would generally want to run higher pressures, while a lighter person would run lower pressures. As a general rule of thumb, you should look for a pressure rise of approximately 7% from your cold tire presure setting to a hot tire that's just been ridden hard. It's best to use a dial type gauge as they usually have finer increments. If your pressure rise from cold to hot is more than 7%, you probably need to run a higher pressure, as the friction caused by too much carcass flex is building too much heat in the tire. If your cold to hot rise is less tan 7%, you may want to lower your pressure slightly to build more heat into the tire. If you're doing a track day, look for 10% rise cold to hot. This is just intended to get you in the right range. Personal preference can also factor in, as everybody's riding style and conditions are different. Use your own judgement. If the bike doesn't feel right to you, then nothing else matters, as you'll be too scared to ride it for tire pressures to make any real difference anyway.
Fuel
There's not alot to say about fuel here, except that you should always use the highest octane fuel available. High octane inhibits detonation, and detonation is the death knell of a 2-stroke. Premium fuel is ALWAYS cheaper than a top end rebuild! It should also be noted that the fuel tank does NOT seem to hold nearly as much fuel as either the owner's manual or the service manual would have you believe. I'm not sure anyone here has come up with a concrete answer, but it would appear that the tank holds between 10.5 and 11 liters. And don't forget...the low fuel warning light is useless.
![Image]()
Injection oil
Good quality injection oil is a must on most any 2 stroke bike, and the Derbi/Gilera 125 is no exception. The Derbi owner's manual specifically recommends Agip Speed 2T for the GPR125, but this is certainly not the only suitable oil. The decal under the seat specifies synthetic, but no particular brand. DO NOT buy oil made for premix only, unless of course you've removed the oil injection system and are actually running premix.
DaonieSidhe brought forth the relevance of the oil spec in one's selection of 2T oils. Different countries use different rating scales for oils. Specs to look for on the back of the oil in question are as follows;
API (American Petroleum Institute) service TC is the highest recommended oil spec for these engines. TB is inferior, and TD is for marine applications. "TC+" means that it exceeds the TC specification but doesn't meet the TD criteria. I believe there is also a TC++ which would also exceed the TC specification and be very suitable.
JASO (Japanese Automobile Standards Organization) service FD is currently the highest rating for a 2T oil.
ISO (International Standardization Organization) service L-EGD is the highest performance rating to this standard.
Some non-synthetics may meet these standards .
Using anything less than the highest oil specification in your bike can be asking for trouble. The oil is the life-blood of the engine. If one is forced to use someting less due to availablity, it should be used for as short a term as possible, and replaced with something more suitable as soon as it's viable. The bike should also be run as gently as possible until an appropriate oil is found. Thanks to DaonieSidhe for bringing forth this important and useful tidbit of info.
As mentioned in the meter section, the low oil warning light should not be ignored, as running out completely will have dire results for your engine. There is still oil in the bottle when the light comes on, but the level should be monitored carefully to avoid severe engine damage.
I recently did a little test to see how far the bike would go on a full oil tank. I filled my oil tank to the top and wrote the current mileage on top of the tank with a marker. I then rode the bike until the low oil warning light came on. With my injection pump cable correctly adjusted, it took over 500 miles for the light to come on, and even then there was still a pretty generous amount of oil in the tank. I've now repeated that same test a few times with almost identical results. The light comes on after about 500 miles and there's still a reasonable amount in the bottle at that point, but don't take it for granted EVER! I carry a small bottle of Motul injection oil under the seat, just to be safe, as I do ride my bike very long distances. On that note, I'll just say that if there are any doubts about the durability or reliability of this engine, you can forget them now. I always use Motul synthetic injection oil and premium grade fuel and I rode my derestricted GPR125 in a motorcycle charity ride, covering just over 650 miles in 11 hours and 16 minutes! Needless to say, most of the distance was done at relatively high speeds and under continuous operation. I have yet to so much as change the spark plug on my bike and it has approximately 4500 miles on it now. I've done at least a thousand of those since that one grueling day. No problems thus far. Take care of it and it will take care of you!
Spares
Parts availability can be sketchy at times for these bikes. Note that aside from colors and badging, the GPR125 Racing and Gilera SC125 ARE the same motorcycle and all parts will interchange. The GPR125 Nude is the same bike except for all the front fairings and lights. A few good sources for parts are Bikespares, Derbi Scooter Spares, PJ Motorcycle Engineers, and of course...Ebay UK.
Cables
Many people have reported failures of the choke cable and throttle cable. Proper periodic cable lubrication may help ward off problems. There also seems to be a discrepancy in the parts catalogue regarding the proper choke cable. If your choke cable has a flat flange on the end of it and attaches to the left switch case with a small screw (as pictured in the parts catalogue), the correct Derbi part number is 00H00906651. If however your cable has a threaded end that screws into the switch case itself, the correct part number is 00H00908651. (note the 8 instead of the 6 at the 4th to last digit). Thanks to mikemac for sorting this out and sharing the info!
Recalls
There is a recall on these bikes for possible frame cracking. A factory fix kit is available to address this issue and there should be no time or mileage restrictions on having the recall performed by an authorized Derbi or Gilera dealer. You can contact your local dealer with your VIN and they should be able to tell you if the recall has been performed or is needed. You can also check for yourself without much trouble. While looking up underneath the front fairing and above the radiator, look for two black steel brackets that go from the top radiator mounts to the frame, like this;
![Image]()
and this:
![Image]()
Then your recall has already been done. If you do not have these brackets, then you need to remove the fuel tank and look at the large tubular cross-brace that runs between the left and right frame spars. If the cross-brace is welded in, then the bike needs the recall done. If it's bolted in, it does not need the frame recall.
(BIG thanks to Cheeky Thomas for the excellent pics and details on this important issue!)
Manuals
There are a number of handy manuals available online to help you with parts acquisition and servicing of your new bike. Bearing in mind that it IS a Yamaha engine, the Yamaha factory manual for the DT125 gives much greater detail when doing any hardcore engine work. It's never good to get in over your head and we each must know our own limitations. If you attempt a repair that's above your personal skill level, it's on you! And I can tell you that we mechanics just LOVE fixing what somebody else screwed up (wink, wink). With that said, here are some online links to useful manuals and catalogs. Note that part numbers for bodywork can be tricky because of different colors and graphics…treat them accordingly! Sorry if some of the downloads are a bit slow, but what do you want for free??? In each link, click where it says "Click here to start download".
GPR125 Racing Service Manual
Yamaha DT125 Service manual (same engine, better manual)
GPR125 Racing Parts catalogue
Now for you poor 4T chaps, here's a little bit of useful info thanks to ROBOSNAIL! Information for resetting the service light, ododmeter, and changing yer clocks from mph to kph or vice versa can be found HERE. It's also noteworthy that there appears to be NO derestriction for the 4T models at this time. What you got is what you got. Sorry.
There now. I think this should get most new owners off to a good start. As I said, I'll try to update this periodically as becomes necessary. Use this information at your own peril and use it only for good and not for evil. Enjoy!
This is a list of the most commonly asked questions by new owners of the GPR125R, GPR125 Nude, and Gilera SC125, all of which are basically the same motorcycle. Note that this thread mostly applies only to the 2 stroke version, not the new 4 stroke version. However, thanks to ROBOSNAIL, we now have at least a little bit of helpful info for you 4T guys. You'll find it at the end of my post here.
BIG UPDATE!!! Finally a little luvin' for you 4T guys, compliments of miniyo! A link to parts, service, and owners manuals for the 4T GPR125. Make sure you look miniyo up here on the forum and give him a standing ovation for providing this much awaited info!
GPR125 4T manuals (click me)
For you 2t guys, please read this thread thoroughly before asking questions in the GPR125 forum which may already be addressed here. There is also a decal on the underside of the front seat with a wealth of quick tidbits of info, such as fuel, oil, and spark plug recommendations, tire pressures, etc. While everyone on the forum is eager to help out new owners, the list tends to get cluttered with the same questions being asked again and again. If you can't find what you're looking for here, then by all means feel free to start a new thread to introduce yourself and pose your question to those who are familiar with these bikes. I'll try to update this FAQ section periodically as the need arises. So without further ado, I give you the Derbi GPR125/Gilera SC125 frequently asked questions!
Derestriction
The most common question new owners have about these bikes is derestricting. The process is quite simple, but the legalities of it a little less so. If you derestrict your bike and it violates the laws of where you live or your particular license status…that's on YOU. This is a guide to tell you how, not a declaration that you should! The benefits are notably increased top end power and speed. This engine is equipped with something called a power valve. It's installed in the exhaust port of the cylinder and makes the port larger or smaller depending on engine speed. When the bike is restricted, the power valve remains in the closed position, thereby restricting exhaust flow and keeping power output down. When you first turn on the key without starting the engine, you'll hear two whirring sounds in succession for about one and a half seconds each time. This is "self-test" of the power valve system and is intended to keep the valve from collecting a lot of carbon buildup and sticking or seizing. Apparently, the self-test occurs even if the bike is still restricted, but the power valve will not function during engine operation unless the bike is derestricted. The system is serviceable should the valve become stuck, but if you're not the mechanically inclined type, you might want to leave the task to someone who is.
The derestriction process is simple. Under the riders seat and towards the right side of the subframe (right side as you're sitting on the bike), you'll find a wiring harness with a fuse holder inline but no fuse in it. Putting a 7.5 amp fuse in the open slot will enable the power valve system and dramatically increase top end speed and power. Putting in a bigger fuse will NOT produce more power. It will only create a risk of doing damage to the electrical portion of the system. Use the 7.5 amp.
There is no restrictor per se in the exhaust system other than the typical conservative build of standard exhaust systems. This exhaust is also equipped with a catalyst which cannot be easily removed. A good aftermarket exhaust will definitely liven things up and shave a fair amount of weight off the bike in the process, but there's really nothing you can do to improve the original exhaust. Again, determining the legality of such modifications is up to you.
The airbox has an inlet funnel which is somewhat restrictive, being that its opening is smaller than the carb venturi, but it serves as more than just a restrictor, being there to smooth the intake of air into the airbox and should really only be removed in the case of bikes that have had greater than typical modifications performed.
Some have suggested that a cooler plug is necessary when derestricting, but in practical application this has proven to be unnecessary and will more likely cause plug fouling. The standard plug is an NGK BR8ES and appears to be fine under all circumstances. Under ALL cases, it is imperative that you always use high octane petrol and a good quality 2 stroke oil made specifically for injection systems. Using anything less falls under the category of being penny-wise and pound foolish, as it will likely result in a VERY expensive engine failure! Don't say you weren't warned!
The carburetor appears to be jetted a wee bit rich from the factory and can stand up to derestriction and seemingly also to an aftermarket exhaust. Removing the airbox restrictor however is more than the standard jetting can take and this will cause performance issues without rejetting.
Gearing
One of the simplest and most effective modifications to these bikes is a gearing change. They appear to be grossly overgeared from the factory and few can pull top gear well, even when derestricted. Changing to a lower final drive ratio absolutely transforms these bikes, making them accelerate much more quickly! There is a slight loss of ultimate top speed, but most can only obtain that speed on a looooong downhill grade. Lowering the final drive ratio makes the bike reach highway speeds with much greater ease under any conditions and makes around town speeds feel much more lively.
The bikes come with 16t front and 50t rear, in spite of the factory service manual indicating that standard gearing is 16t front and 57t rear! Getting the bike closer to the ratio indicated in the service manual is definitely a change for the better. Dropping the front sprocket one tooth (from 16 down to 15) is a quick, cheap fix and a step in the right direction.
It is my personal opinion however (and you know what they say about opinions) that this is not enough of a ratio change to truly make the most of the power output of these bikes. However, dropping to a 14t front sprocket puts too much stress on both the chain and the chain slipper on the swingarm. A better but pricier solution is to go with a 15t front and a 53 or 54t rear. If you're a smallish person, the 15/53 should prove to be a good combination. If you're a larger person, you may wish to go with a 54t rear. Note that going to a larger rear sprocket will also necessitate a longer chain which makes this an even pricier endeavor. This is not a bad thing though, as the standard chain appears to be of VERY poor quality and will be short lived anyway even with faithful care. This ratio change just gives you a good reason to buy a better quality chain. The standard chain is 428 x 130 links. Going to a smaller front sprocket and larger rear sprocket will require a chain at least 132 links in length, possibly 134 links if you go with the 54t rear. My personal GPR, derestricted and with an Arrow pipe, standard carb and jetting, and a 15/53 ratio will still pull 89 mph on top (GPS verified…the standard speedo is crap!). If you need to go faster than that on public roadways, you're a menace anyway.

Sprocket availability for this bike is nowhere near as good as say your average GSXR, but we won't go there. Front sprockets can be had by ordering for a Yamaha YZ85, (Thanks Banzairx7!) or by ordering from JT Sprockets . There doesn't appear to be any reasonable off-the-shelf replacement for the rear wheel sprocket. However, Rebel Gears in the United States has the specs for this sprocket, can make one with as many teeth as you like, and ships worldwide. Their alloy sprockets are strong, lightweight, and very attractive. I opted for the ultralight model, having far more lightening holes than their standard alloy sprocket. Turned out looking like this:
Should you wish to have a rear sprocket made by someone closer to you, the rear sprocket specs are as follows;
Flat - no offset
428 pitch
5 bolt pattern
Center hub hole diameter = 61.85 mm (2.435")
Bolt hole diameter = 10mm (0.394")
Distance from edge of hub hole to edge of bolt hole = 17.9 mm (0.705")
Distance from hub center to bolt hole center = 53.825 mm (2.12")
Any sprocket maker worth his salt should be able to make you a rear sprocket from these dimensions.
Meters
Although the owner's manual states that the speedometer can be switched between mph and kph, it seems that many of them simply won't do it. Some who had their clocks replaced under warranty say that their originals would switch, but the replacements won't. In short, if you've tried repeatedly to get yours to switch (following the procedure in the owner's manual…you do know where your owner's manual is, right??), then odds are that they're not going to. The standard speedometers are typically a bit optimistic, but this should just help keep you out of trouble, eh?
The low fuel warning light is simply put, a useless and unreliable piece of dung. If the bike is started and allowed to idle while sitting on the sidestand when the tank is a bit low on fuel, the warning light will come on prematurely. VERY annoying. I recommend unplugging it to avoid the annoyance of it altogether. It's one simple connector located under the fuel tank (it's the ONLY electrical connector coming off the fuel tank). Once the low fuel warning light comes on (the little petrol pump flashing on the digital display), the small display at the bottom will randomly start doing a count up, which appears to be the distance you've traveled since the warning came on. It will go away once you refill the petrol tank. The tripmeter works fairly well, so the smart thing to do is to ALWAYS reset the tripmeter when refilling the petrol tank. When getting used to the bike, it's wise to ride approximately 95 miles (150 kilometers) and then either carry a small petrol can with you, or have someone follow you with a spare petrol can and ride the bike until it runs out of fuel. Now look at your tripmeter…that's how far you can go before you're pushing the bike instead of riding it. Note for those sorely lacking in common sense: Many factors can affect fuel consumption, such as around town riding vs. highway riding, modifications, etc, so it's wise to always allow a margin for error, unless of course you like pushing your bike more than riding it.
I won't go into setting the clock or resetting the service reminder, as these items are readily found in the owner's manual…read it!
There is an indicator to warn you when the injection oil level is low. Don't panic when it comes on, as there is a reasonable amount of oil left in the bottle at this point (I've gone 30 miles with the light on without running totally out of oil). But do NOT ignore the light, as running the bottle empty WILL do significant and expensive engine damage!
Mirrors
Put simply, the GPR mirrors look cool, but they're fragile, expensive, and useless for actually seeing behind you. There is some hope though for repairing and modifying them to make them more useful. This step by step how-to comes from Banzairx7...master of modifications for the GPR.
Once you've got the mirror off the bike you need separate the base from the mirror. Use the open end of a 13mm wrench with a screwdriver through the box end to remove the brass nut.

Then you need to unpin the connector to slide the base off the wire. Use a very small screwdriver to push the tabs on the pins down. then be sure to bend the tabs back up so they'll stay in the connector when it goes back together. I used a razor blade for that.


Now you'll find the broken pieces. The washer embedded in the base just pulls out and takes some plastic with it. You can pop this washer back in place pretty easily. Don't worry about gluing it or anything.


Now you'll need a washer with an ~1/2"(13mm)ID X 15/16"(24mm)OD. Then grind a large flat on one side of the washer.

Now put the mirror back together with the washer like this-

Now slide on two more smaller washers and tighten the brass nut down. These washers aren't as critical as the first they just need to fit over the threaded stud coming off the mirror. The thread on this stud doesnt go all the way so you need these washers so the nut will tighten everything down with out bottoming.

This step here is optional but I highly recommend it. Put a washer on the rear most stud before putting the base back on. This will give you a much better rear view of the world through the mirror.

Now slide the base back over the wire and put your connector back together. Bolt the mirror back on the bike and your done. The mirror is much more stable and doesn't shake nearly as much now with the stock set up.
Brakes
The GPR125/SC125 brakes are somewhat lackluster for what appear to be top notch components, and they do have their issues as well. The standard front pads are horribly noisy. Aftermarket replacements are available from Brembo, EBC, and GoldFren to name a few. It's important to note that when shopping for replacements that the 125 uses the "radial mount type" front caliper. Interestingly enough though, when I ordered GoldFren pads for mine, even though they were supposed to fit the radial mount calipers, they did not. I was able to grind some material off the backing plate of the pads though and make them fit. They've worked well for me thus far. There have been MANY reports of front caliper pistons seizing and premature failure of the REAR pads. I personally have experienced neither and my bike is ridden hard and ridden often. Of those who've reported these failures, the cure seems to be aftermarket pads for the rear, and meticulous cleaning and lubricating of the front caliper pistons and seals. In spite of much expensive experimentation, I've found it impossible to bring the standard front brakes up to "Superbike quality". I believe the problem lies in the master cylinder ratios, but unfortunately, physical constraints don't allow for easy retrofitting of something better.
Tires and Tire pressures
Like everything else, opinions vary in regards to tires. My personal opinion regarding the standard Pirelli Sport Demons is very poor, but that's just my opinion…some people love them. It is noteworthy however that many current top shelf sportbike tires come in sizes suitable for this bike. No one here as yet has tried replacing the standard 110 front with a 120, which I think would be ill-advised as the 120 tire is recommended for a notably wider wheel. Should someone here actually attempt to fit a 120 to their Derbi front wheel and survive it, their personal results will be included...and Godspeed to them.

Tire pressures are a very subjective thing. Regardless of whether it's a car or a bike, you should always refer to the vehicle manufacturer's recommendations, not the tire manufacturer. For the GPR125/SC125, the recommended pressure is 26 psi front and 29 psi rear. These should be used as starting points, because no one pressure will be ideal for everybody all the time. A heavier rider or someone who carries a passenger or heavy packages on their bike would generally want to run higher pressures, while a lighter person would run lower pressures. As a general rule of thumb, you should look for a pressure rise of approximately 7% from your cold tire presure setting to a hot tire that's just been ridden hard. It's best to use a dial type gauge as they usually have finer increments. If your pressure rise from cold to hot is more than 7%, you probably need to run a higher pressure, as the friction caused by too much carcass flex is building too much heat in the tire. If your cold to hot rise is less tan 7%, you may want to lower your pressure slightly to build more heat into the tire. If you're doing a track day, look for 10% rise cold to hot. This is just intended to get you in the right range. Personal preference can also factor in, as everybody's riding style and conditions are different. Use your own judgement. If the bike doesn't feel right to you, then nothing else matters, as you'll be too scared to ride it for tire pressures to make any real difference anyway.
Fuel
There's not alot to say about fuel here, except that you should always use the highest octane fuel available. High octane inhibits detonation, and detonation is the death knell of a 2-stroke. Premium fuel is ALWAYS cheaper than a top end rebuild! It should also be noted that the fuel tank does NOT seem to hold nearly as much fuel as either the owner's manual or the service manual would have you believe. I'm not sure anyone here has come up with a concrete answer, but it would appear that the tank holds between 10.5 and 11 liters. And don't forget...the low fuel warning light is useless.

Injection oil
Good quality injection oil is a must on most any 2 stroke bike, and the Derbi/Gilera 125 is no exception. The Derbi owner's manual specifically recommends Agip Speed 2T for the GPR125, but this is certainly not the only suitable oil. The decal under the seat specifies synthetic, but no particular brand. DO NOT buy oil made for premix only, unless of course you've removed the oil injection system and are actually running premix.
DaonieSidhe brought forth the relevance of the oil spec in one's selection of 2T oils. Different countries use different rating scales for oils. Specs to look for on the back of the oil in question are as follows;
API (American Petroleum Institute) service TC is the highest recommended oil spec for these engines. TB is inferior, and TD is for marine applications. "TC+" means that it exceeds the TC specification but doesn't meet the TD criteria. I believe there is also a TC++ which would also exceed the TC specification and be very suitable.
JASO (Japanese Automobile Standards Organization) service FD is currently the highest rating for a 2T oil.
ISO (International Standardization Organization) service L-EGD is the highest performance rating to this standard.
Some non-synthetics may meet these standards .
Using anything less than the highest oil specification in your bike can be asking for trouble. The oil is the life-blood of the engine. If one is forced to use someting less due to availablity, it should be used for as short a term as possible, and replaced with something more suitable as soon as it's viable. The bike should also be run as gently as possible until an appropriate oil is found. Thanks to DaonieSidhe for bringing forth this important and useful tidbit of info.
As mentioned in the meter section, the low oil warning light should not be ignored, as running out completely will have dire results for your engine. There is still oil in the bottle when the light comes on, but the level should be monitored carefully to avoid severe engine damage.
I recently did a little test to see how far the bike would go on a full oil tank. I filled my oil tank to the top and wrote the current mileage on top of the tank with a marker. I then rode the bike until the low oil warning light came on. With my injection pump cable correctly adjusted, it took over 500 miles for the light to come on, and even then there was still a pretty generous amount of oil in the tank. I've now repeated that same test a few times with almost identical results. The light comes on after about 500 miles and there's still a reasonable amount in the bottle at that point, but don't take it for granted EVER! I carry a small bottle of Motul injection oil under the seat, just to be safe, as I do ride my bike very long distances. On that note, I'll just say that if there are any doubts about the durability or reliability of this engine, you can forget them now. I always use Motul synthetic injection oil and premium grade fuel and I rode my derestricted GPR125 in a motorcycle charity ride, covering just over 650 miles in 11 hours and 16 minutes! Needless to say, most of the distance was done at relatively high speeds and under continuous operation. I have yet to so much as change the spark plug on my bike and it has approximately 4500 miles on it now. I've done at least a thousand of those since that one grueling day. No problems thus far. Take care of it and it will take care of you!
Spares
Parts availability can be sketchy at times for these bikes. Note that aside from colors and badging, the GPR125 Racing and Gilera SC125 ARE the same motorcycle and all parts will interchange. The GPR125 Nude is the same bike except for all the front fairings and lights. A few good sources for parts are Bikespares, Derbi Scooter Spares, PJ Motorcycle Engineers, and of course...Ebay UK.
Cables
Many people have reported failures of the choke cable and throttle cable. Proper periodic cable lubrication may help ward off problems. There also seems to be a discrepancy in the parts catalogue regarding the proper choke cable. If your choke cable has a flat flange on the end of it and attaches to the left switch case with a small screw (as pictured in the parts catalogue), the correct Derbi part number is 00H00906651. If however your cable has a threaded end that screws into the switch case itself, the correct part number is 00H00908651. (note the 8 instead of the 6 at the 4th to last digit). Thanks to mikemac for sorting this out and sharing the info!
Recalls
There is a recall on these bikes for possible frame cracking. A factory fix kit is available to address this issue and there should be no time or mileage restrictions on having the recall performed by an authorized Derbi or Gilera dealer. You can contact your local dealer with your VIN and they should be able to tell you if the recall has been performed or is needed. You can also check for yourself without much trouble. While looking up underneath the front fairing and above the radiator, look for two black steel brackets that go from the top radiator mounts to the frame, like this;

and this:

Then your recall has already been done. If you do not have these brackets, then you need to remove the fuel tank and look at the large tubular cross-brace that runs between the left and right frame spars. If the cross-brace is welded in, then the bike needs the recall done. If it's bolted in, it does not need the frame recall.
(BIG thanks to Cheeky Thomas for the excellent pics and details on this important issue!)
Manuals
There are a number of handy manuals available online to help you with parts acquisition and servicing of your new bike. Bearing in mind that it IS a Yamaha engine, the Yamaha factory manual for the DT125 gives much greater detail when doing any hardcore engine work. It's never good to get in over your head and we each must know our own limitations. If you attempt a repair that's above your personal skill level, it's on you! And I can tell you that we mechanics just LOVE fixing what somebody else screwed up (wink, wink). With that said, here are some online links to useful manuals and catalogs. Note that part numbers for bodywork can be tricky because of different colors and graphics…treat them accordingly! Sorry if some of the downloads are a bit slow, but what do you want for free??? In each link, click where it says "Click here to start download".
GPR125 Racing Service Manual
Yamaha DT125 Service manual (same engine, better manual)
GPR125 Racing Parts catalogue
Now for you poor 4T chaps, here's a little bit of useful info thanks to ROBOSNAIL! Information for resetting the service light, ododmeter, and changing yer clocks from mph to kph or vice versa can be found HERE. It's also noteworthy that there appears to be NO derestriction for the 4T models at this time. What you got is what you got. Sorry.
There now. I think this should get most new owners off to a good start. As I said, I'll try to update this periodically as becomes necessary. Use this information at your own peril and use it only for good and not for evil. Enjoy!
")


